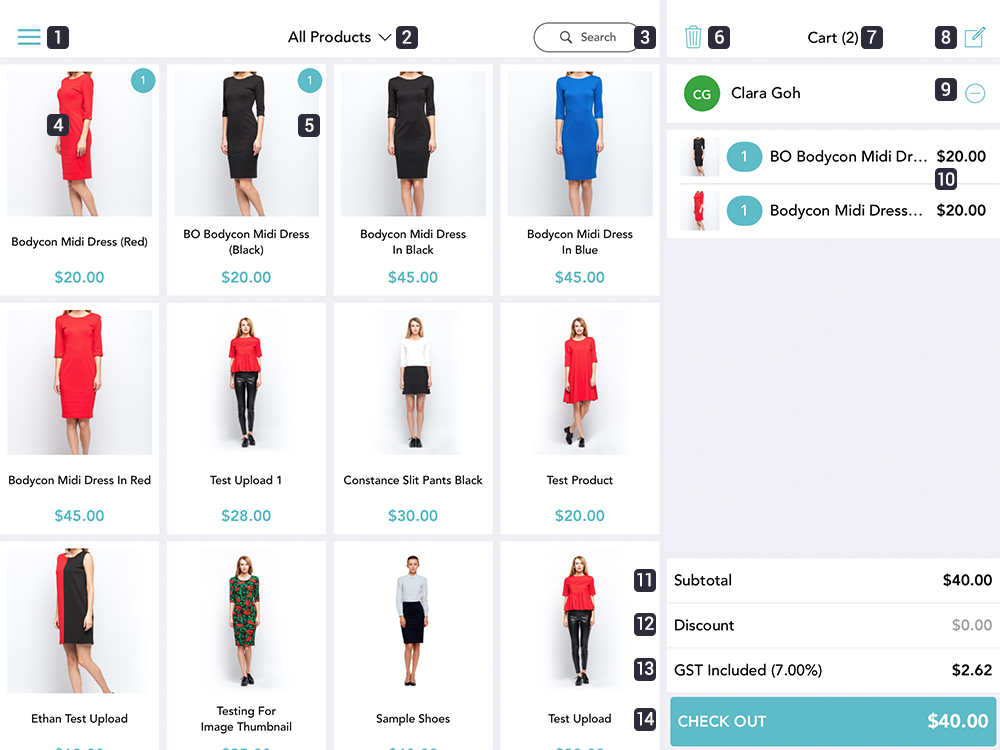
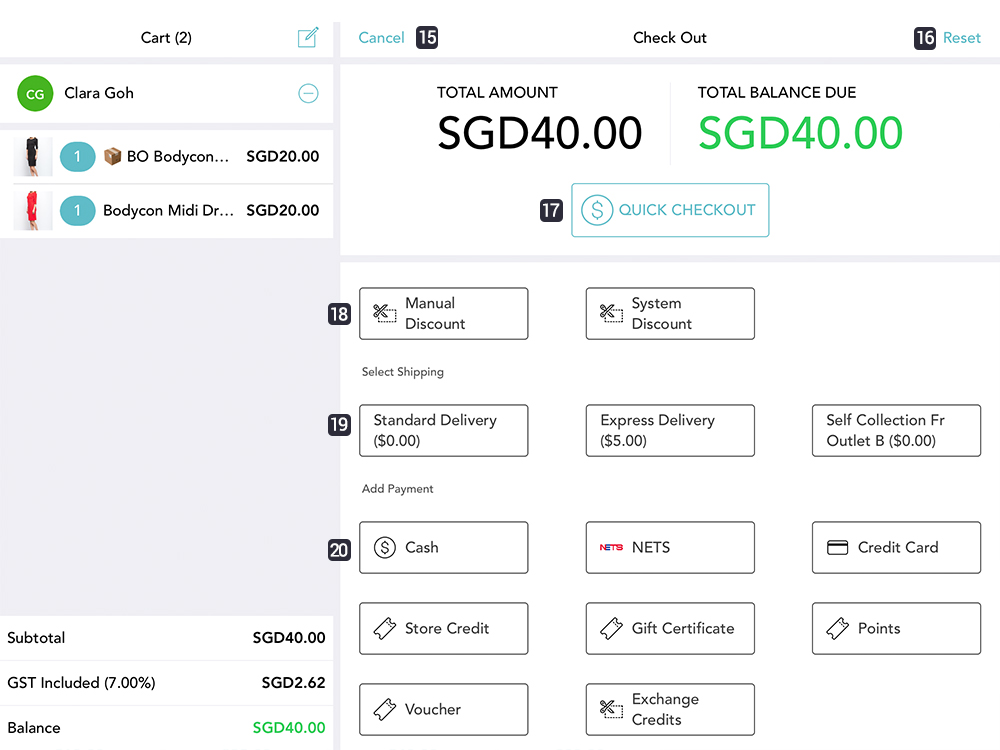
This guide includes provide introduction to the Shopcada POS interface and the important keys.

- The Menu Toggle:
Tap this to launch the navigation menu to access to supporting functions.
You will access sales history, stock transfer, self collection, refund, open/close register, reprint receipt etc here. - The Product Categories:
Tap this to launch the drop down menu to access product by categories.
Categories as per setup at your web store. - Product Search:
You may search a product (using name or SKU) and add the product to cart. - Product Thumbnail:
You can tap on the product thumbnail to add product to cart, the POS system will prompt you to select variants, if needed.
Tap and hold to view the product details information, such as category, collections, inventory status at all locations, rack number at all location. - Quantity Added To Cart:
Indicator of total quantity of the product is added to cart. - Clear Cart (Trash Bin):
Tap on this to clear your cart content, including customer selected. - Cart Quantity:
The number show total items added to cart. - Add Order Remark:
Tap on this to launch the order comment text box. Comment will save as admin comment at order manager. - Customer Name:
Add the customer to the order. Customer will be able to see the orders' history when they login to their account at website.
A customer must add to order in order to redeem store credit/gift credit/limited discounts.
If the customer wish to ship the item from warehouse, they details must added to an order. - Cart Content:
You can view the summary of the cart, including products added to cart, quantity of each product and price.
Tap on a product to change the quantity, apply product manual discount, update the variant, enable ship from warehouse and/or remove the product from cart. - Subtotal:
This is the total price of the products in the cart. - Discount:
This is show the discount amount applied to order. - GST:
This is the GST amount, calculated based on required method. - Checkout:
This is the total price of the the cart.
Tap on this button to proceed to payment and check out. - Cancel:
Tap on Cancel to cancel the check out. You will return to main page, with all the items and customer remain. - Reset:
Tap on Reset to remove all the applied discount/payment mode/selected ship mode. You will stay at the checkout page once you reset, and you can redo all the selection. - Quick Checkout:
Tap on Quick Checkout to accept payment and complete the sales. - Manual Discount and System Discount:
Tap on these button to apply discount to the order.
Manual discount allow cashier manually enter discount by fix amount or by percentage.
System discount will list all the discount created and control by system. - Shipping Mode:
Tap to apply shipping mode for the SHIP FROM WAREHOUSE products. - Payment Mode:
Tap to select preferred payment mode, and you are required to enter amount by each mode.
You are allow to apply multiple payment modes for one order, e.g.: Gift certificate and cash.


