Overview
The J&T Express (SG) app books your packages with J&T Singapore from the Shopcada dashboard. J&T then updates each package as it moves. Shopcada can email your customer when the package is on the way and when it is delivered.
Create a Package
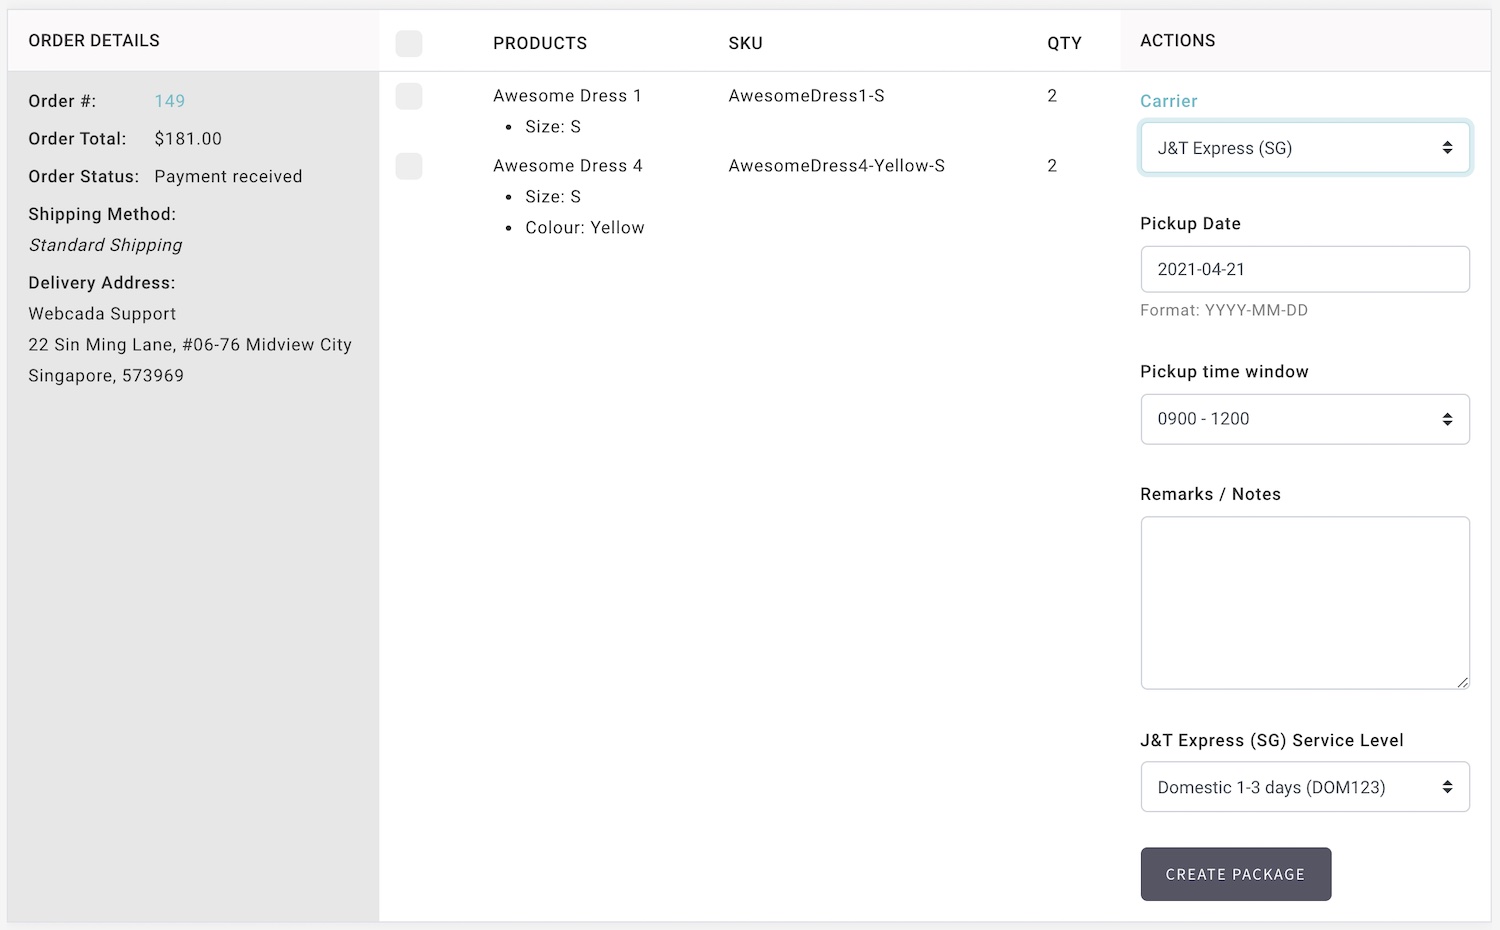
- Navigate to Dashboard > Orders > Fulfil Orders > Create Packages.
- Find the order.
- Select the items to ship.
- Select J&T Express (SG) as the Carrier.
- Choose the Pickup Date. It starts as tomorrow, or as the last date you used if that is not past.
- Choose the Pickup time window.
- Check the Remarks / Notes. J&T gets them only if you turn on Include checkout comment as pickup instruction.
- Check the J&T Express (SG) Service Level. It starts as the level set for the order’s shipping method, or Domestic Next Day (DOMN) if none is set.
- Click Create Package.
The message Shipment for Order … submitted to J&T successfully confirms the booking. The package gets J&T’s tracking number, and the order status changes to Awaiting Shipper.
No pickup or service level fields after you select J&T Express (SG)?
The connection is not finished. Fill in the Merchant Code and all four pickup fields. See Connect Your Store to J&T.
If the Package Is Not Created
| Message | What to do |
|---|---|
| Shipping Parcel Dimension not configured properly. Please configure it. | International Delivery needs a parcel size. Fill in Shipment Length, Shipment Width and Shipment Height. See Connect Your Store to J&T. |
| Package is not created for order … followed by J&T’s reason | J&T refused the booking. Fix what J&T’s reason names, then try again. |
Create Packages in Batch
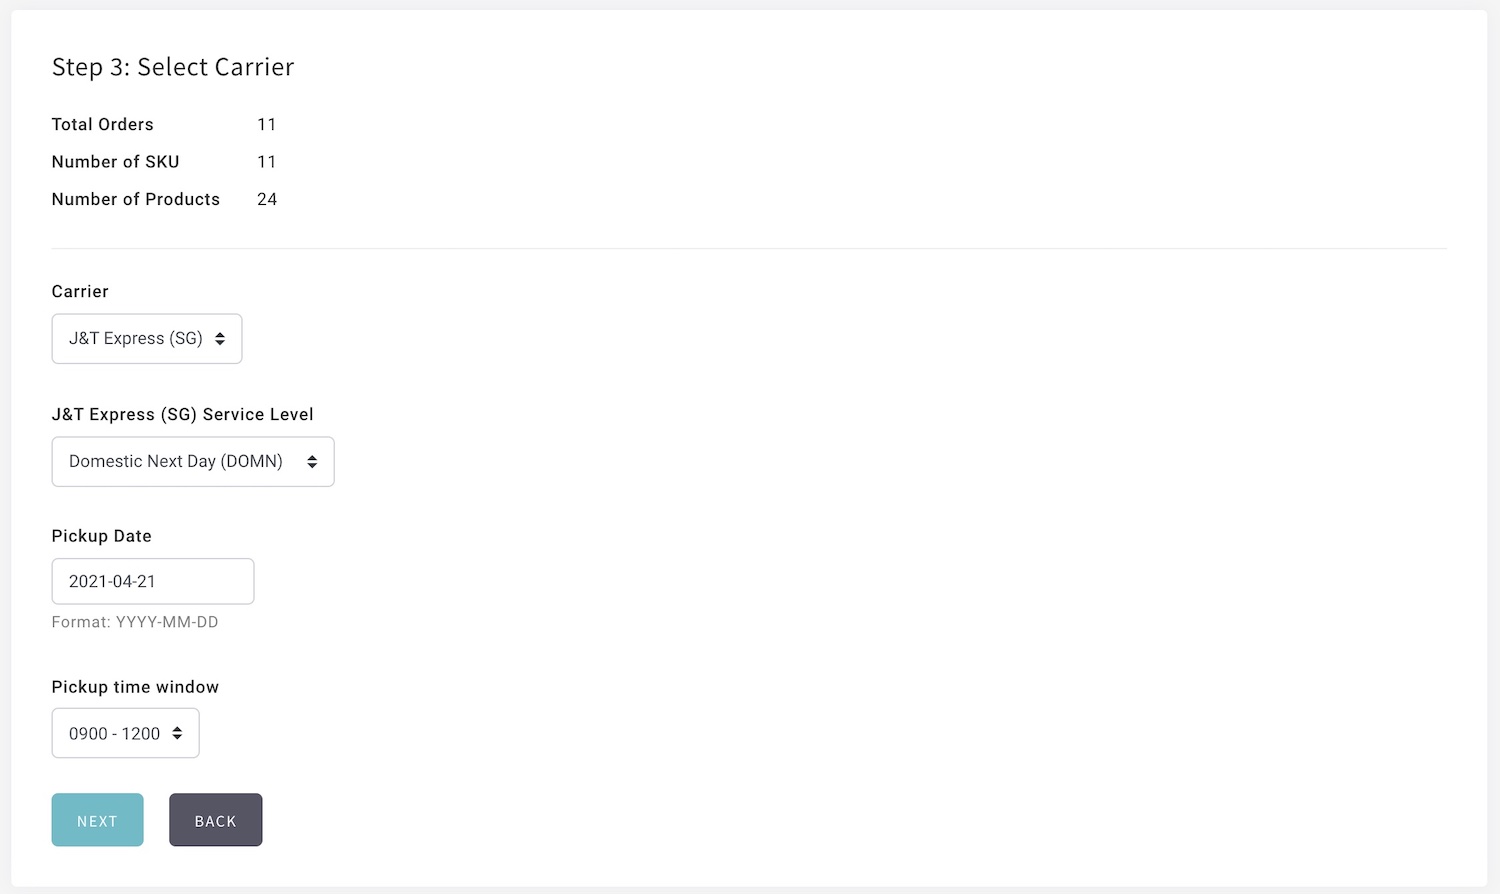
- Navigate to Dashboard > Orders > Fulfil Orders > Batch Create Packages.
- Complete Step 1: Filter Orders and Step 2: Confirm Orders as usual.
- At Step 3: Select Carrier, select J&T Express (SG) as the Carrier.
- Under J&T Express (SG) Service Level, choose a level for each shipping method in the batch.
- Choose the Pickup Date. It has no default, so you must pick one.
- Choose the Pickup time window.
- Click Next.
- At Step 4: Confirmation, check the orders.
- Click Create Package.
Batch bookings have no Remarks / Notes field. J&T gets each order’s checkout comment if you turn on Include checkout comment as pickup instruction.
The results page lists any order that failed, with the reason. Check the order log before you try that order again.
How J&T Updates Your Orders
After J&T collects a package, J&T tells your store each time its status changes. Shopcada then updates the package for you. This needs the webhook in Add the Webhook in J&T.
| J&T status | What Shopcada does |
|---|---|
| Any update after pickup, such as at the hub, out for delivery, or a failed delivery | Marks the package and the order At Shipper. Sends the At Shipper email if it is on. Happens once per package. |
| Delivered | Marks the package Shipped. Changes the order status to Completed once every item has shipped, or Partially Fulfilled until then. Sends the delivery email if it is on. |
| Returned to sender | Marks the package Returned and adds a note to the order log. The items go back to the order, ready to pack again. The order status does not change. Shopcada sends no email. |
| Cancelled or lost | Cancels the package in Shopcada. The items go back to the order. Changes the order status to Payment received, or to Partially Fulfilled if another package has shipped. A lost parcel also adds a note to the order log. |
See Turn On the Shipment Emails for what each email says.
Cancel a Package
- Navigate to Dashboard > Orders > Fulfil Orders > Manage Packages.
- Find the package.
- Click Delete Package.
Shopcada asks J&T to cancel the booking, then cancels the package in your store. Delete test shipments the same way.
The order status does not change. Update it yourself if you will not book the order again.
Shopcada does not cancel a delivered package at J&T. Once a package is Shipped, the button is Delete Shipped Package. Only staff with that permission see it. It removes the package from your store only.
If J&T refuses, Shopcada still cancels the package in your store. An error says the package was not cancelled at J&T, with J&T’s reason. Cancel the booking in the J&T portal yourself.
Set Up J&T Express (SG)
You need a J&T Singapore business account and its merchant code.
Install the App
- Navigate to Dashboard > App Store.
- Open J&T Express SG.
- Click Install.
Once it is installed, click Settings on the app page to open the J&T Express (SG) settings.
Add the Webhook in J&T
The webhook lets J&T send package updates to your store.
- Log in to your J&T portal.
- Go to Service Management > Tracking.
- Click Add Webhook.
- Enter the Payload URL:
https://www.yourdomain.com/api/jtexpress. Use your store’s own domain. - Enter a Secret key. Use a long, random mix of letters and numbers.
- Keep a copy of the key.
- Tick all the events and statuses.
- Click Add Webhook.
The secret key must match the Webhook Secret in Shopcada exactly. If it does not, your store ignores J&T’s updates and shows no error.
Connect Your Store to J&T
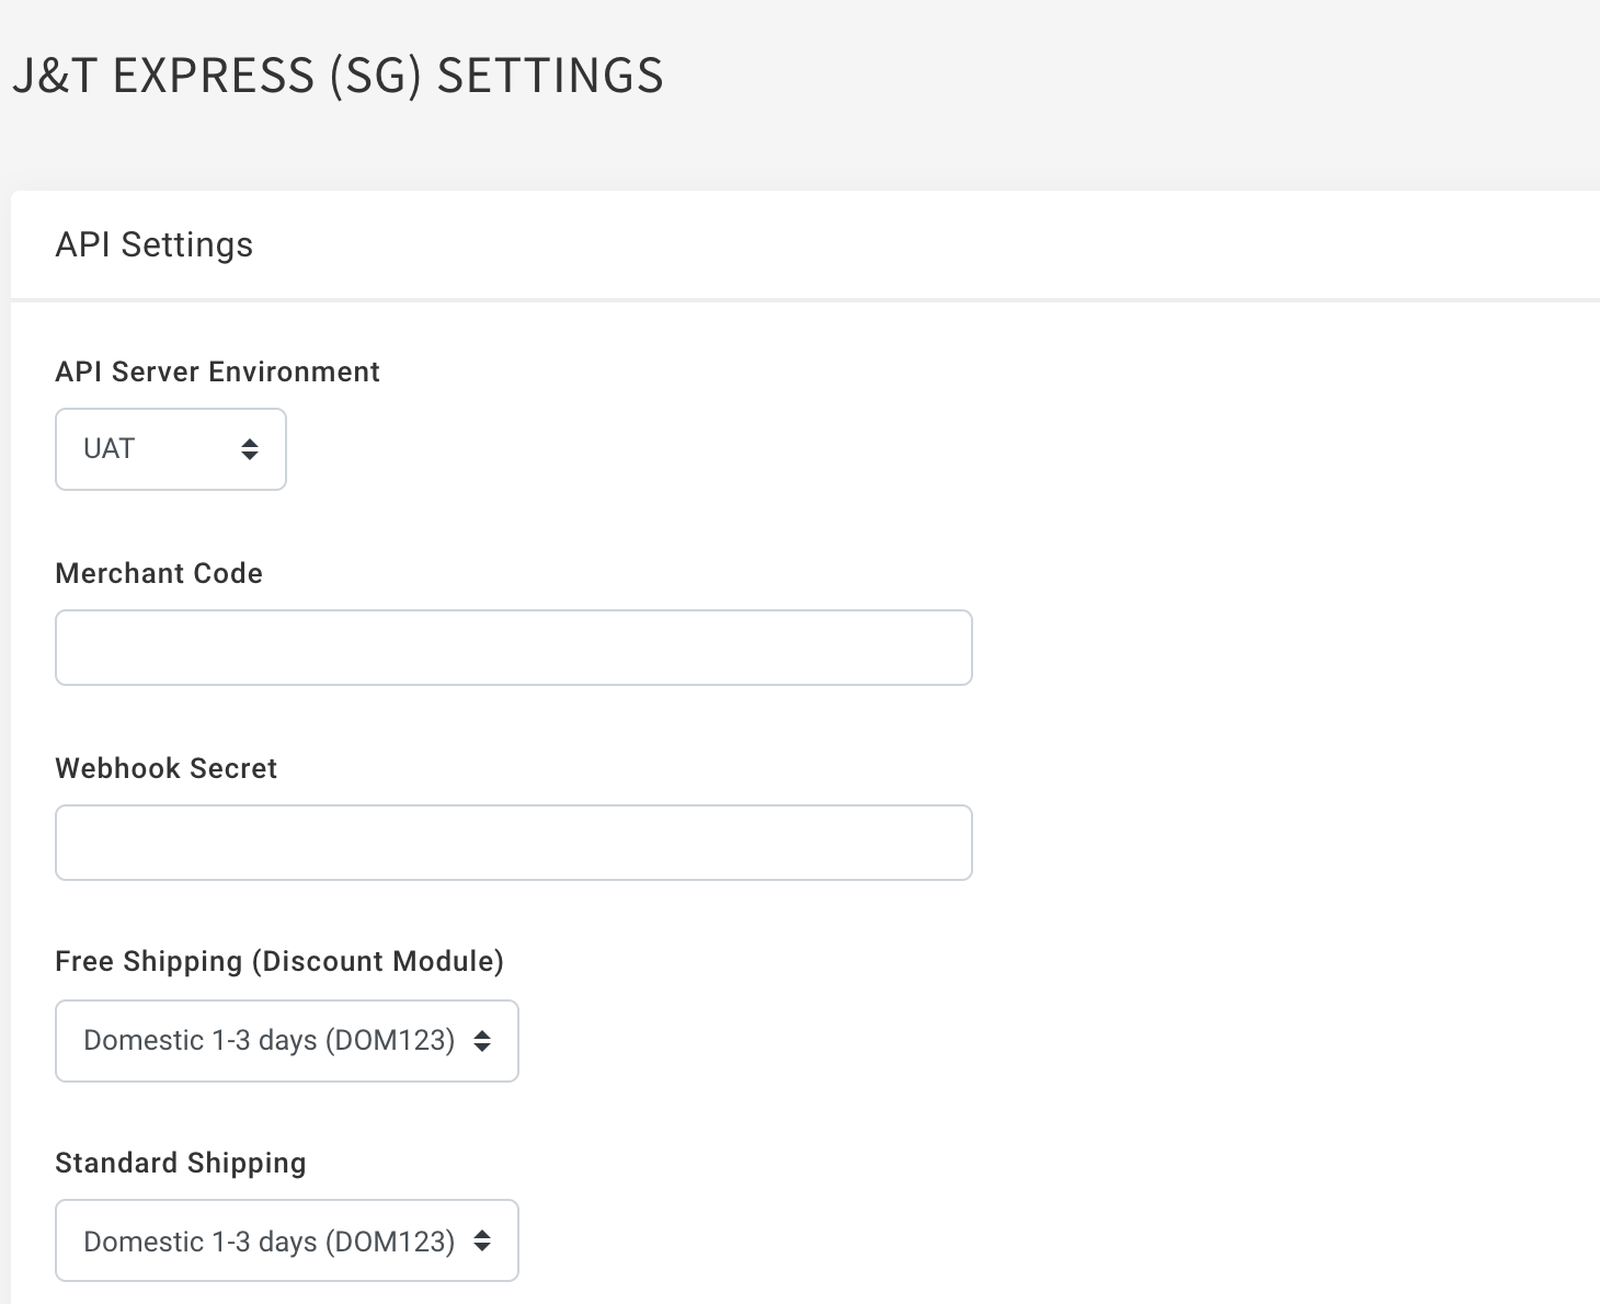
- Navigate to Dashboard > Settings > Orders, then click the Carriers Settings tab.
- Click Configure next to J&T Express (SG).
- Fill in the fields below.
- Click Save.
| Field | Description |
|---|---|
| API Server Environment | Choose Production to book real shipments. UAT is J&T’s test server, and it is the default. |
| Merchant Code | Required. The code J&T gives your business. |
| Webhook Secret | The secret key you entered in the J&T portal. |
| One list for each shipping method | The service level to use for orders with that shipping method. Choose Domestic Next Day (DOMN), Domestic 1-3 days (DOM123), Premium+ Delivery or International Delivery. Leave Please Select for methods you do not send with J&T. |
| Pickup Contact Name | Required. The person J&T contacts at pickup. |
| Pickup Phone Number | Required. Their phone number. |
| Pickup Address | Required. Where J&T collects your packages. |
| Postal Code of Pickup Address | Required. The postal code of that address. |
| Reference Number Prefix | Up to 10 characters added in front of the J&T reference number. The reference is the prefix, the order number, then a letter for each package (A, B, C). |
| Base weight | The weight, in grams, sent to J&T for each product in the package. The default is 0. |
| Add Products Weight to the base weight | Off by default. When on, Shopcada adds each product’s own weight to the base weight. |
| Shipment Length, Shipment Width, Shipment Height | Required for International Delivery only. The parcel size in cm. |
| Include checkout comment as pickup instruction. | On by default. When on, Remarks / Notes starts with the customer’s checkout comment. When off, J&T gets no remarks, even ones you type. |
Turn On the Shipment Emails
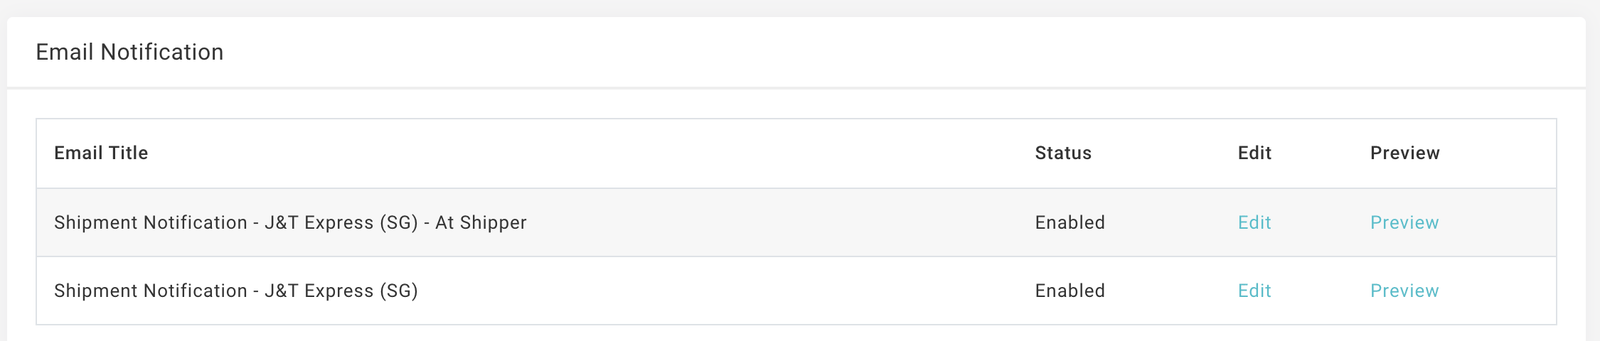
Both emails start switched off.
- Navigate to Dashboard > Settings > Emails.
- Under Order Fulfilment, click Edit next to the email.
- Turn on Enable this email notification.
- Click Save.
| Sent when | |
|---|---|
| Shipment Notification - J&T Express (SG) - At Shipper | J&T sends its first update after pickup. By default, it includes the tracking number and a J&T tracking link. |
| Shipment Notification - J&T Express (SG) | J&T marks the package delivered. |
Both emails are also listed under Email Notification, at the bottom of the J&T Express (SG) settings page.